Git For Data Analysts: The Complete Guide

Maybe I’m alone in this, but when I’m building anything, be it a piece of data analysis using R, a VBA script or even writing an in-depth document, I can guarantee that somewhere along the line, I’m going to break something or take it in a direction that I’m going to want to change later on.

This is why I started using version control, Git in particular, for all my analysis work. In today’s post, I’m going to take you through why it’s important for data analysts and how you can work it into your own workflow for free.

This is a very long piece, so feel free to jump around using the table of contents below and please share this with anyone you think it might help.

If you like what you see and you’d to download this as a handy PDF for reference, just sign up to my email list and you’ll get a PDF copy for free when I’ve finished making it look pretty.

Sending

Contents

  1. What Is Git?
    1. How Does Git Work?
      1. Different Repository Hosts
      2. Installing And Setting Up Git
        1. Setting Up Git On Windows
          1. Installing Git On A Mac
            1. Adding A Text Editor To Git
              1. Using A Text Editor In Git
                1. Installing A Git Difftool
                2. Setting Up SSH Keys With Git
                  1. What Are SSH Keys?
                    1. Generating SSH Keys
                      1. Add Your SSH Key To The Agent
                        1. Launching The SSH Agent On Windows
                          1. Adding Your SSH Key To The SSH Agent For Mac
                            1. Add SSH Keys To GitHub
                              1. Add SSH Key To Bitbucket
                              2. Setting Up Your Gitignore File
                                1. Creating A Gitignore File
                                  1. Setting Up A Global Gitignore
                                  2. Basic Git/ Linux Commands
                                    1. Changing Directories In Git
                                      1. Listing Files In A Directory In Git
                                        1. Creating Directories In Git
                                          1. Deleting Directories In Git Bash
                                            1. Copying And Pasting In Git Bash
                                            2. Setting Up Your First Repo
                                              1. Creating Repositories In GitHub
                                                1. Creating Repositories In Bitbucket
                                                2. Committing In Git
                                                  1. Adding Changes To Your Commit
                                                    1. Git Commit Commands
                                                      1. Commit Messages
                                                      2. Pushing In Git
                                                        1. Pushing Changes To Your Repository
                                                        2. Branching In Git
                                                          1. Creating Branches In Git
                                                            1. Switching Branches In Git
                                                              1. Deleting Branches In Git
                                                              2. Best Practices For Branching In Git
                                                                1. The Master Branch
                                                                  1. The Development Branch
                                                                    1. Feature Branches
                                                                    2. Merging Branches In Git
                                                                      1. The Git Merge Command
                                                                      2. Pulling From Git Repos
                                                                        1. The Git Pull Command
                                                                        2. Pull Requests In Git
                                                                          1. Creating A Pull Request
                                                                          2. Cloning Repositories In Git
                                                                            1. The Git Clone Command
                                                                              1. Git Clone With SSH Vs Without
                                                                                1. Finding SSH And Non-SSH Repo URLs In GitHub
                                                                                  1. Finding SSH And Non-SSH Repo URLs In Bitbucket
                                                                                  2. Forking In Git
                                                                                    1. The Git Fork Process
                                                                                      1. Automatically Add Upstream Changes To Your Fork
                                                                                      2. Rolling Back Changes In Git
                                                                                        1. Revert A Local Git Commit That Hasn’t Been Pushed
                                                                                          1. Unstage Changes In Git
                                                                                            1. The Git Revert Command
                                                                                              1. Reverting Changes In Specific Files
                                                                                              2. Stashing And Applying Changes In Git
                                                                                                1. The Git Stash Command
                                                                                                  1. Adding Your Changes With Git Stash Apply
                                                                                                    1. Seeing Changes In Your Stash Vs Your Current Commit
                                                                                                    2. Merge Conflicts In Git And How To Fix Them
                                                                                                      1. Fixing Merge Conflicts In Git
                                                                                                        1. Communication Solves Merge Conflicts
                                                                                                        2. Cherry Picking In Git
                                                                                                          1. Using Git Cherry Pick
                                                                                                            1. Additional Git Cherry Pick Parameters
                                                                                                              1. Challenges With Git Cherry Pick
                                                                                                              2. Rebasing Your Git Repository
                                                                                                                1. Using Standard Git Rebase
                                                                                                                  1. Using Interactive Git Rebase
                                                                                                                  2. Further Reading
                                                                                                                    1. Shout Outs
                                                                                                                    2. Wrapping Up

                                                                                                                      What Is Git?

                                                                                                                      Git is the most popular version control tool available. It’s free, open source and dates all the way back to 2005 when it was created by Linus Torvalds, the man behind the Linux operating system. Git is constantly maintained and is used every day by hundreds of thousands of people, from software engineers working on the bleeding edge, to students writing their first line of code.

                                                                                                                      The key advantage of Git over other version control systems is that it’s distributed rather than singular the way many others are. This means that every user working on the project has the full repository and access to all changes rather than only one full version existing.

                                                                                                                      Through this, much more efficient development can be achieved and it also ensures that everyone is working off of the same codebase. It’s also fast and is built with security in mind.

                                                                                                                      How Does Git Work?

                                                                                                                      In basic terms, every project that you manage with Git (called a repository, or “repo”) is a snapshot of all the associated files. This snapshot updates with every commit (more on that later), ensuring that it’s always covering the latest version of all files.

                                                                                                                      The repository is stored on your computer (or a remote/ virtual machine if you’re working like that), but in order to ensure that your files remain controlled and available to other team members, there is a second component: the repository host.

                                                                                                                      Different Repository Hosts

                                                                                                                      There are a number of repository hosting platforms out there – the most popular is GitHub, which you’ll probably have heard of, but there are others such as Bitbucket, GitLab and Codebase. For the majority of this tutorial, we’re going to use Bitbucket, simply because it offers free private repositories, whereas GitHub only offers free public repos.

                                                                                                                      The commands we’ll run through today work the same way across all hosts; the only difference is the web interface used when you set up your accounts and repositories which, again, we’ll cover as we go on.

                                                                                                                      Now we know what Git is and why we should use it, let’s get set up.

                                                                                                                      Installing And Setting Up Git

                                                                                                                      Before you can use Git on your Windows or Mac machine, you have to install it and get it set up correctly. There are a number of steps which you need to follow in order to get it up and running effectively and efficiently, but I’ll take you through them in the next few sections, which cover both Windows and Mac.

                                                                                                                      Setting Up Git On Windows

                                                                                                                      The easiest way to get Git and other handy Linux utilities such as SSH running on Windows is to use Git Bash, which is essentially a Linux emulator for Windows. Git Bash gives you everything you need to manage your repos as well as a range of other Linux tools, and it’s free. Can’t really beat that.

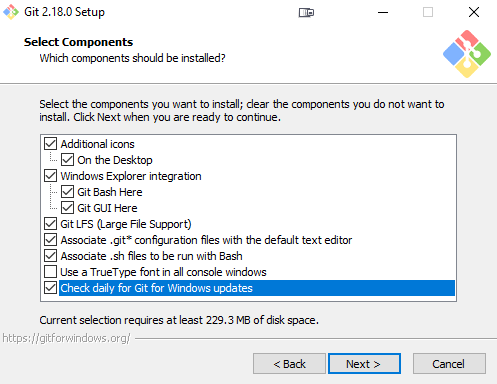
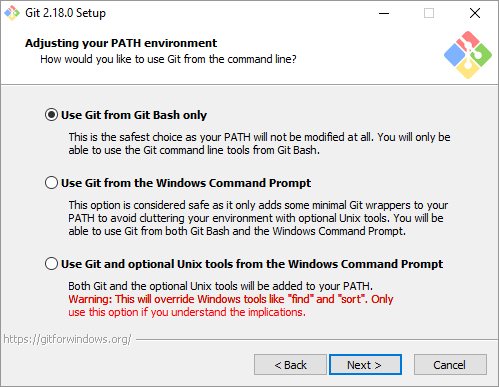
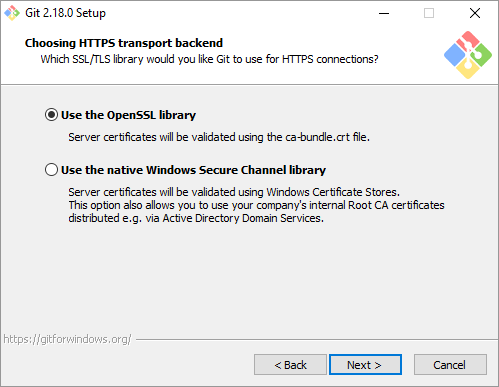
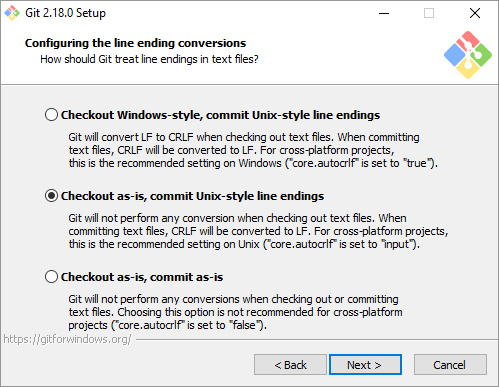
                                                                                                                      Installation is the standard Windows download and double-click, but there are a few other steps that you’ll need to take to get it up and running smoothly.

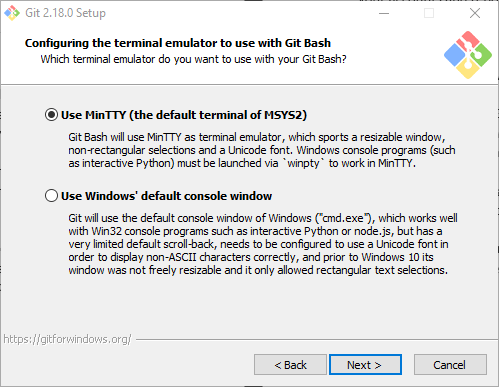
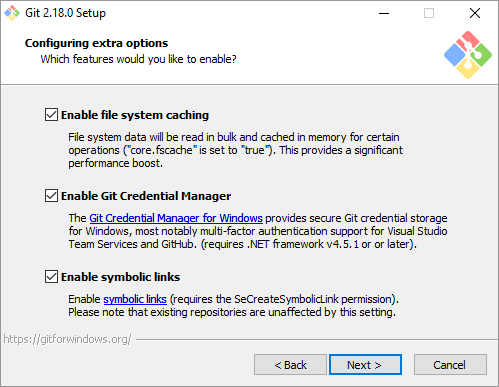
                                                                                                                      As you go through the installation process, you’ll be asked a couple of questions. In the images below, you’ll see the best way to set it up

                                                                                                                      Install Git For Windows
                                                                                                                      Make sure you enable daily updates
                                                                                                                      Choose Git Text Editor Windows
                                                                                                                      Choose your default text editor. I recommend Visual Studio Code
                                                                                                                      Use Git Bash Only
                                                                                                                      It’s best to use Git Bash only
                                                                                                                      Use the OpenSSL Library
                                                                                                                      The OpenSSL library is an easier way to use things
                                                                                                                      Checkout as-is, commit Unix-style line endings
                                                                                                                      Use the Checkout as-is, commit Unix-style line endings option
                                                                                                                      Use the MinTTY terminal on Windows
                                                                                                                      Use the MinTTY terminal
                                                                                                                      Enable file cache in Git for Windows
                                                                                                                      Enabling file cache will help performance

                                                                                                                      Now that you’ve got Git installed on your Windows machine, we just need to do a couple of small things in your git config file so that everything is easily trackable within repositories – kind of the whole point of Git, after all.

                                                                                                                      The following two commands will add your name and email address to your git config:

                                                                                                                      git config --global user.name "YOUR NAME"
                                                                                                                      git config --global user.email "YOUR EMAIL"
                                                                                                                      

                                                                                                                      And there we have it. Git for Windows is installed and ready to go, but there are still a couple of other bits that we should do to make your workflow as efficient as possible.

                                                                                                                      Installing Git On A Mac

                                                                                                                      Installing Git on a Mac is a bit simpler than using Windows since their operating systems are Linux based.

                                                                                                                      As with Windows, install the Git package as you normally would using a Mac and follow the installation steps the installer takes you through.

                                                                                                                      Once this is completed, check that it’s all worked as you’d like by opening up a terminal and entering the following command:

                                                                                                                      git –version

                                                                                                                      You should be greeted by a version number.

                                                                                                                      Assuming that’s worked correctly, you’ll now need to run the following commands to get your name and email associated with your installation, meaning your commits can be tracked.

                                                                                                                      git config --global user.name "YOUR NAME"
                                                                                                                      git config --global user.email "YOUR EMAIL"
                                                                                                                      

                                                                                                                      And we’re ready to go. Now let’s add a text editor to our configuration.

                                                                                                                      Adding A Text Editor To Git

                                                                                                                      If you want to get the best out of Git, you’ll want to link it with a text editor like Microsoft Visual Studio Code or Sublime Text. Visual Studio Code integrates with Git Bash out of the box for Windows and that’s my preferred tool. It’s a really good, lightweight editor and has support for R, Python and most other programming languages.

                                                                                                                      However, if you’d like to use a different text editor, that’s fine. You can still add it to your path and invoke it with the relevant command in your Bash terminal. The following will work with almost any text editor and you can name the command whatever you like to help you remember it.

                                                                                                                      These commands are for Windows and Mac.

                                                                                                                      Under your user’s home directory (usually C:/Users/USERNAME, but it could change depending on where you’ve installed Git Bash), create a file called .bash_profile.

                                                                                                                      Now add the following line to this file. You’ll need to change it to fit your text editor’s installation, but here’s an example for Sublime Text:

                                                                                                                      alias 'subl="/c/Program Files/Sublime Text 3/subl.exe"'

                                                                                                                      This will allow you to open Sublime Text using the “subl” command. If you went with Visual Studio Code during the installation, you can use the command “code” to open it without changing your path.

                                                                                                                      Using A Text Editor In Git

                                                                                                                      Using the text editor from Git is a really handy and efficient way to manage your files and it’s a great way to get up and running on your code quickly, as you can create and edit the files directly from the terminal. Have a go yourself with the following command. If you used a different text editor from Visual Studio Code, make sure you change the editor command to fit.

                                                                                                                      code test.R

                                                                                                                      This will open up Visual Studio Code and also create an R file called test. It will also automatically switch to the R text highlighter, so you can get coding straight away. Handy, right? There are a huge number of things that you can do with your text editor being added to your Git path, so it’s well worth taking the extra time to do this during setup.

                                                                                                                      Installing A Git Difftool

                                                                                                                      A difftool is a piece of software which lets you compare the differences in the file you’re working on to the last time the file was committed to the repository. You can use the built in git diff command, but it’s not the smoothest experience.

                                                                                                                      External difftools can be very useful and provide a range of functionality outside of the console. Personally, I’m a fan of P4Merge by Perforce, which is free for Windows and Mac, but there are plenty of others out there, such as KDiff3, Meld or Beyond Compare.

                                                                                                                      In your home directory, you’ll find a file called .gitconfig. Navigate to that folder within your terminal (see Basic Commands if you’re not sure how – it’s vital you’re in the right directory here, otherwise it won’t work) and open it up with your text editor with the following:

                                                                                                                      YOUREDITORCOMMAND .gitconfig

                                                                                                                      Now add the following lines to the file, replacing “PATHTO” with the path to the difftool and if you want to use a different difftool, replace the name accordingly:

                                                                                                                      [diff]
                                                                                                                      	tool = p4merge
                                                                                                                      [difftool "p4merge"]
                                                                                                                      	path = PATHTO\p4merge.exe
                                                                                                                      [difftool]
                                                                                                                      	prompt = false
                                                                                                                      

                                                                                                                      By adding prompt = false, it means the difftool will open straight away rather than asking you if you want it to do that, saving you time.

                                                                                                                      So now we’ve got Git installed, our text editor set up and our difftool ready to go, let’s jump into the next piece of setup work: our SSH keys.

                                                                                                                      Setting Up SSH Keys With Git

                                                                                                                      If you want pushing your work to your repository to be smooth and efficient without needing to enter a password every time you push, as well as being able to manage servers directly from your terminal, you’ll need an SSH key.

                                                                                                                      I warn you now, these can sometimes be a bit of a pain to set up on Windows (particularly since most of the guides out there only cover half the job), but hopefully this guide will help make that a smoother process.

                                                                                                                      What Are SSH Keys?

                                                                                                                      SSH keys are a way to securely interact with a server, encrypting the traffic between your machine and the endpoint. They work on a key pair process, where one key is stored on your machine and the other is on the remote server. They are an encrypted key which is randomly generated and equivalent to a password that is hundreds of characters long.In order to use SSH with Git, you’ll need to create a key pair and then share your public key with your hosting platform of choice. Here’s how to do that.

                                                                                                                      Generating SSH Keys

                                                                                                                      To create your SSH keys for your machine, open Git Bash and paste the following command:

                                                                                                                      ssh-keygen -t rsa -b 4096 -C "YOUR EMAIL"

                                                                                                                      This command generates your SSH key pair using the RSA cypher, which is considered the more secure approach, and the optional -b numeric value determines how many “bits” the key uses (the size of the key). 4096 makes it a bigger, more secure key.

                                                                                                                      You should see a message telling you that it is generating a new key pair.

                                                                                                                      Next, it will ask you to decide where you’d like to save your key. Just hit enter and use the default here.

                                                                                                                      Now it’ll ask you for a passphrase. It’ll give you the option to have no passphrase, but since we’re doing this in the name of security, you really should add one. Make sure you don’t lose it, or you’ll have to create new keys and potentially lose access to your repositories.

                                                                                                                      Read my post on security practices to see more about how to choose a good password.

                                                                                                                      Add Your SSH Key To The Agent

                                                                                                                      The SSH Agent is a process that runs in the background when Git Bash or your terminal are running. It keeps your keys “live” and means that you don’t have to keep entering your passphrase every time you try to interact with the server. It’s a vital step in ensuring smooth workflow and, if nothing else, adding the password every time you try to push your changes to the repository is really annoying.

                                                                                                                      This is the part that can be a bit of a pain on Windows: the agent doesn’t launch as soon as you open Git Bash unless you specifically tell it to, which is different to the behaviour on a Mac. We’ll run through the process here.

                                                                                                                      Launching The SSH Agent On Windows

                                                                                                                      Launch the agent manually the first time with the following command:

                                                                                                                      eval $(ssh-agent -s)

                                                                                                                      This will turn it on and give you the number referring to the agent’s PID.

                                                                                                                      Now we need to add your private SSH key to the agent so it’s ready to use. Here’s how we can do that.

                                                                                                                      ssh-add ~/.ssh/id_rsa

                                                                                                                      That’s your SSH agent launched and your key added to it, but now we need to do some extra work to make sure that your agent launches every time you open Git Bash.

                                                                                                                      Break out your trusty text editor again on either your .profile or .bashrc file, whichever you have. They will be in your home directory.

                                                                                                                      Paste the following lines in:

                                                                                                                      env=~/.ssh/agent.env
                                                                                                                      
                                                                                                                      agent_load_env () { test -f "$env" && . "$env" >| /dev/null ; }
                                                                                                                      
                                                                                                                      agent_start () {
                                                                                                                          (umask 077; ssh-agent >| "$env")
                                                                                                                          . "$env" >| /dev/null ; }
                                                                                                                      
                                                                                                                      agent_load_env
                                                                                                                      
                                                                                                                      # agent_run_state: 0=agent running w/ key; 1=agent w/o key; 2= agent not running
                                                                                                                      agent_run_state=$(ssh-add -l >| /dev/null 2>&1; echo $?)
                                                                                                                      
                                                                                                                      if [ ! "$SSH_AUTH_SOCK" ] || [ $agent_run_state = 2 ]; then
                                                                                                                          agent_start
                                                                                                                          ssh-add
                                                                                                                      elif [ "$SSH_AUTH_SOCK" ] && [ $agent_run_state = 1 ]; then
                                                                                                                          ssh-add
                                                                                                                      fi
                                                                                                                      
                                                                                                                      unset env
                                                                                                                      

                                                                                                                      Save and close the file.

                                                                                                                      Now every time you turn on your computer or re-initialise the SSH Agent, you’ll have to enter your SSH key’s password, but it’ll be the only time you have to do it, rather than every time you push your work.

                                                                                                                      Adding Your SSH Key To The SSH Agent For Mac

                                                                                                                      Adding your SSH key to the SSH Agent and running it automatically is a bit easier on a Mac.

                                                                                                                      In your terminal and your Git home directory, enter the following command:

                                                                                                                      eval "$(ssh-agent -s)"

                                                                                                                      You should be shown your agent’s PID number, as with Windows.

                                                                                                                      On newer versions of Mac OS, you’ll need to edit your SSH config file to automatically load your keys and to manage your passwords with the keychain.

                                                                                                                      Open your text editor on ~/.ssh/config and add the following to it:

                                                                                                                      Host *
                                                                                                                       AddKeysToAgent yes
                                                                                                                       UseKeychain yes
                                                                                                                       IdentityFile ~/.ssh/id_rsa
                                                                                                                      

                                                                                                                      Now enter

                                                                                                                      ssh-add -K ~/.ssh/id_rsa

                                                                                                                      and this will add your key to the agent and store your password in the keychain.

                                                                                                                      Now it’s time to add our keys to our chosen Git repository hosting service.

                                                                                                                      Add SSH Keys To GitHub

                                                                                                                      GitHub is one of the most popular Git hosting platforms and is known for its slick user interface. As such, adding your SSH keys to it is easy.

                                                                                                                      Log in to your account (free for public repositories, paid if you want to have private ones) and navigate to the Settings section.

                                                                                                                      GitHub SSH Settings

                                                                                                                      Click on SSH and GPG keys in the left navigation and you’ll be presented with a screen where you can add your keys.

                                                                                                                      Add SSH keys to GitHub

                                                                                                                      As you can see, you can add multiple SSH keys, which is ideal if you switch between computers such as work and home.

                                                                                                                      Click “New SSH Key” and give it a name. I usually use Work and Home to clearly differentiate between my machines.

                                                                                                                      Now we need to paste the key into the Key box. In order to get this into your clipboard on Windows, you’ll need to run the following command from your Git terminal:

                                                                                                                      cat ~/.ssh/id_rsa.pub

                                                                                                                      and then copy the output from the terminal by highlighting and using ctrl+ins (the usual ctrl+c doesn’t work in Git Bash).

                                                                                                                      On Mac, it’s a little easier to copy your SSH key. Just enter:

                                                                                                                      pbcopy < ~/.ssh/id_rsa.pub

                                                                                                                      Now on GitHub, paste your key into the box and hit save. You’re done.

                                                                                                                      Add SSH Key To Bitbucket

                                                                                                                      Bitbucket from Atlassian is another popular repository hosting platform and has the advantage of being free for public and private repositories, although there are paid versions as well. I’m a big fan of Bitbucket and use it for most of my analysis work.

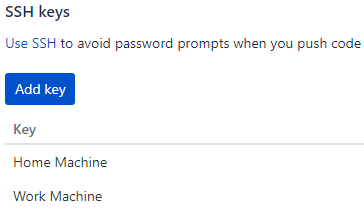
                                                                                                                      Adding an SSH key to Bitbucket is also really easy and, like with GitHub, you can have a number of them should you have different computers.

                                                                                                                      Log in to your account, click your profile icon in the bottom left corner of the screen and click Bitbucket Settings.

                                                                                                                      This will take you to the settings screen where you can configure everything about your Bitbucket account, including adding your SSH keys.

                                                                                                                      Bitbucket settings

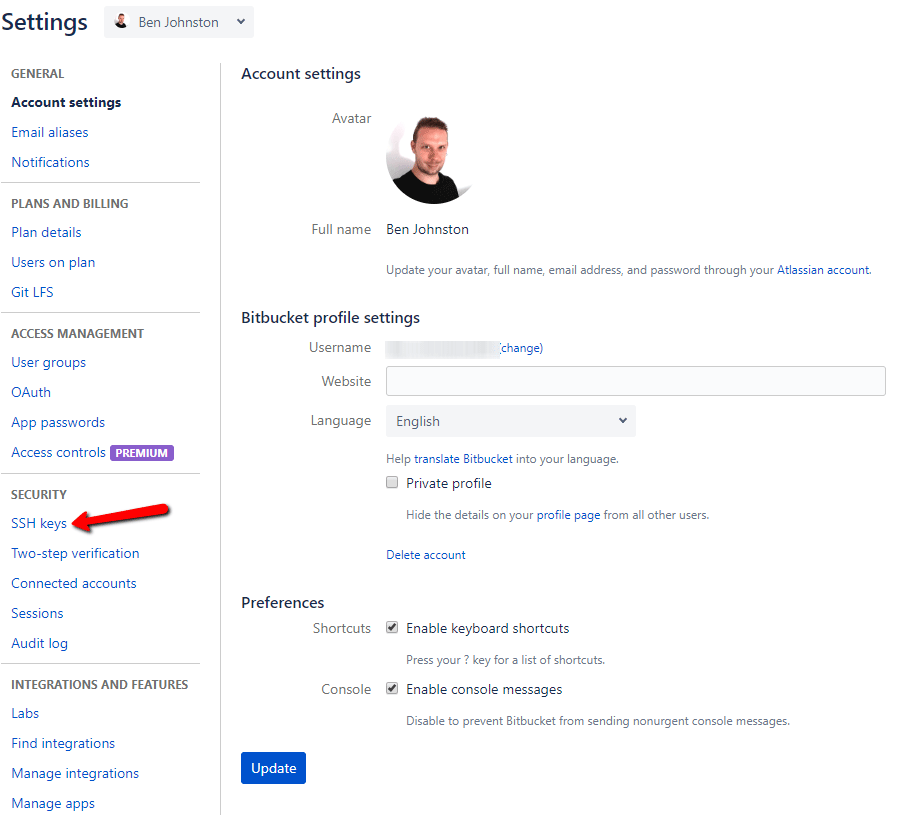
                                                                                                                      From here, click Add Key and give it a name.

                                                                                                                      Add SSH Key to Bitbucket

                                                                                                                      Now we need to paste the key into the Key box. In order to get this into your clipboard on Windows, you’ll need to run the following command from your Git terminal:

                                                                                                                      cat ~/.ssh/id_rsa.pub 

                                                                                                                      and then copy the output from the terminal by highlighting and using ctrl+ins (the usual ctrl+c doesn’t work in Git Bash).

                                                                                                                      On a Mac, it’s a little easier to copy your SSH key. Just enter:

                                                                                                                      pbcopy < ~/.ssh/id_rsa.pub

                                                                                                                      Now on Bitbucket, paste your key into the box, click save and you’re all done.

                                                                                                                      There are a number of other Git repository hosts out there, but they all work in much the same way.

                                                                                                                      Setting Up Your Gitignore File

                                                                                                                      There are always some files that you won’t want to put in your repo. These can be a range of things, such as files which are too large to efficiently commit, your data or database or temporary files. This is where your .gitignore file comes in. It’s a file which tells Git which files not to commit and it’s a pretty essential component of your version control setup.

                                                                                                                      If you use RStudio, it sets one up for you every time you create a project, using the default settings, which is pretty handy, but if you’re not using that or your IDE doesn’t create one for you, you’ll need to create your own. Here’s how you can do that.

                                                                                                                      Creating A Gitignore File

                                                                                                                      To create one manually is really easy. Just navigate to your project folder (check out Basic Commands if you’re not sure how) and run the following command. I’ve done it for using Visual Studio Code, but if you chose a different text editor during setup, just change “code” to your chosen call.

                                                                                                                      code .gitignore

                                                                                                                      This will create a plain text file with that name in your project directory and open up your text editor for you.

                                                                                                                      Add your chosen files to it. For example:

                                                                                                                      .Rproj.user
                                                                                                                      .Rhistory
                                                                                                                      .RData
                                                                                                                      *.tmp

                                                                                                                      Save it and you’re done. In this case, Git won’t commit your R project files.

                                                                                                                      If you want to exclude an entire directory, such as your data folder, add the following

                                                                                                                      /Folder

                                                                                                                      With the name of your folder.

                                                                                                                      Easy, right?

                                                                                                                      But we don’t want to do that with every repo we create, do we? What if there was a way for this to happen automatically every time?

                                                                                                                      Fortunately, there is.

                                                                                                                      Setting Up A Global Gitignore

                                                                                                                      A global gitignore file is exactly what it sounds like – a file which excludes certain files or folders from Git every time. It’s really worth taking the time to set one of these up as it’ll save you lots of time in the long run. If you have project-specific files which you want to exclude, you can still create a standard .gitignore file for those and they’ll still be removed.

                                                                                                                      Here’s how to do it:

                                                                                                                      On Windows, you can create your global gitignore like so, using your chosen text editor:

                                                                                                                      code PATHTOYOURUSERPROFILE/ignore

                                                                                                                      Where PATHTOYOURUSERPROFILE is the path to your user’s home directory on your PC. The easiest way to get that is to go to your explorer and locate it that way and then copy it from the top bar using right click.

                                                                                                                      On a Mac, it’s a little less convoluted as you don’t have to find your user profile directory.

                                                                                                                      The command is:

                                                                                                                      code ~/.config/git/ignore

                                                                                                                      Now those common files you ignore every time you start a project will automatically be excluded.

                                                                                                                      Here’s what mine looks like. It excludes common RStudio files, MS Office temporary files like Excel, PowerPoint and Word and my data folder which always has the same name, but some of the older pieces I need to go back to occasionally aren’t always consistent with capitalisation.

                                                                                                                      .Rproj.user
                                                                                                                      .Rhistory
                                                                                                                      .RData
                                                                                                                      *.tmp
                                                                                                                      
                                                                                                                      # Word temporary
                                                                                                                      ~$*.doc*
                                                                                                                      
                                                                                                                      # Excel temporary
                                                                                                                      ~$*.xls*
                                                                                                                      
                                                                                                                      # Excel Backup File
                                                                                                                      *.xlk
                                                                                                                      
                                                                                                                      # PowerPoint temporary
                                                                                                                      ~$*.ppt*
                                                                                                                      
                                                                                                                      # Data Folder
                                                                                                                      
                                                                                                                      Data/
                                                                                                                      
                                                                                                                      data/
                                                                                                                      

                                                                                                                      You can put whatever files or folders you like in your global gitignore and it’s well worth setting up – it’ll save you hours going forwards.

                                                                                                                      Basic Git/ Linux Commands

                                                                                                                      There are a number of basic Linux commands that you’ll need to know to make your life with Git easier, from changing directories to copying and pasting, creating and deleting files and folders.

                                                                                                                      We’ll cover the specific Git commands for pushing, committing and so on as we go through their specific sections, but here, we’ll handle some of the more basic ones to get you up and running.

                                                                                                                      Changing Directories In Git

                                                                                                                      For those of you that are old enough to remember using DOS before Windows 95 came along (yes, I am that old), this will be pretty familiar. It’s the good old CD command to change directories/ folders in Git.

                                                                                                                      • Move up a folder within current directory: cd NAME OF FOLDER
                                                                                                                      • Move back a folder: cd .. (note the space)
                                                                                                                      • Move to a folder outside the current directory: cd FULL PATH TO FOLDER

                                                                                                                      And there you have it. The basic commands for navigating folders in Git.

                                                                                                                      Listing Files In A Directory In Git

                                                                                                                      Another very useful basic command in Git is to list the files within your current folder or subfolders, or even the files tracked within your repo. Here’s how you can do that.

                                                                                                                      ls

                                                                                                                      This will list all the commands in your working directory, ideal if you need to know what you’re working with.

                                                                                                                      Creating Directories In Git

                                                                                                                      Creating new directories in Git is very easy and something that you’re likely to need to do regularly. Here’s how to do it.

                                                                                                                      mkdir NAME

                                                                                                                      Where NAME is the name of the directory you want to create.

                                                                                                                      Deleting Directories In Git Bash

                                                                                                                      Again, this might be something that you have to do fairly regularly. Here’s how to delete directories in Git:

                                                                                                                      rm DIRECTORYNAME

                                                                                                                      Where DIRECTORYNAME is the name of the directory you want to delete.

                                                                                                                      Copying And Pasting In Git Bash

                                                                                                                      For Mac and Linux users, this probably won’t change too much, but for Windows users, copying and pasting is a little different. The traditional CTRL+C/ CTRL+V doesn’t work.

                                                                                                                      To copy and paste in Git Bash on Windows, you need the following commands.

                                                                                                                      • Copy: CTRL+INSERT
                                                                                                                      • Paste: SHIFT+INSERT

                                                                                                                      It can be a bit of an adjustment for long-time Windows users, but that’s how to copy and paste in Git Bash.

                                                                                                                      Setting Up Your First Repo

                                                                                                                      Now we’re all set up and we know some of the basic commands we’ll need, let’s create our first repo.

                                                                                                                      The creation is done through the web interface of your chosen hosting platform, but after that, it’s all handled through your terminal.

                                                                                                                      Again, the different Git hosts have slightly different ways of doing things. I’ll run through doing it in GitHub and Bitbucket.

                                                                                                                      Creating Repositories In GitHub

                                                                                                                      To create your first repo in GitHub, log into your account and follow the steps below.

                                                                                                                      Create a new repo in GitHub
                                                                                                                      Create a new repository in GitHub
                                                                                                                      Creating repos with GitHub
                                                                                                                      Follow these final steps to create your GitHub repo

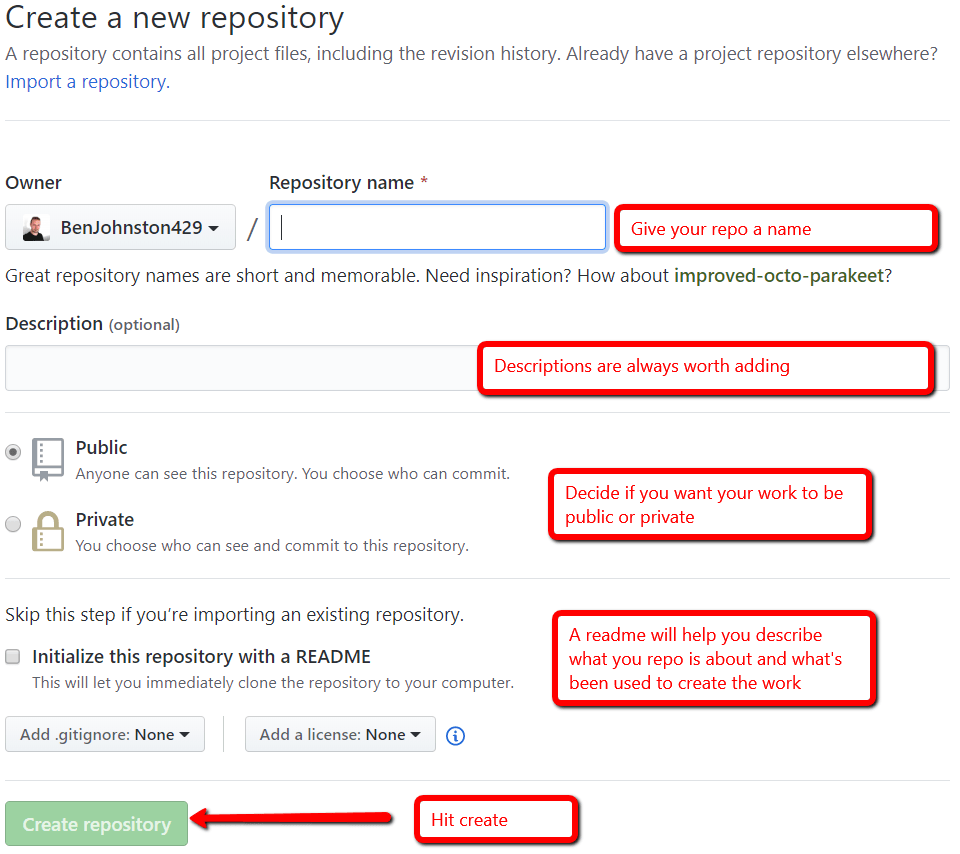
                                                                                                                      Once this is done, you need to get the repo ready on your local machine. If you followed the steps in the SSH keys section, this is really easy. Just use the following command:

                                                                                                                      git remote add origin URLTOREPO

                                                                                                                      Now you’ve got your new repo on your machine and linked with your GitHub repo.

                                                                                                                      And we’re done.

                                                                                                                      Different repo hosts have different initiation commands, but they’re all pretty similar and well documented, so you shouldn’t have any issues if you choose a different platform.

                                                                                                                      Creating Repositories In Bitbucket

                                                                                                                      To create your first repository in Bitbucket, it’s fairly similar to GitHub in that you have to create it on the host and then link it with your local directory.

                                                                                                                      Log in to your account and follow the steps below. Notice that with Bitbucket, you have the option to create a private repository for free, which is cool if you don’t feel like sharing your work with the world and don’t have the cash to spare.

                                                                                                                      Here’s how you can create a repo with Bitbucket.

                                                                                                                      Creating repos with Bitbucket
                                                                                                                      First, login and select Create
                                                                                                                      Additional Bitbucket repo settings
                                                                                                                      Follow the rest of the setup instructions

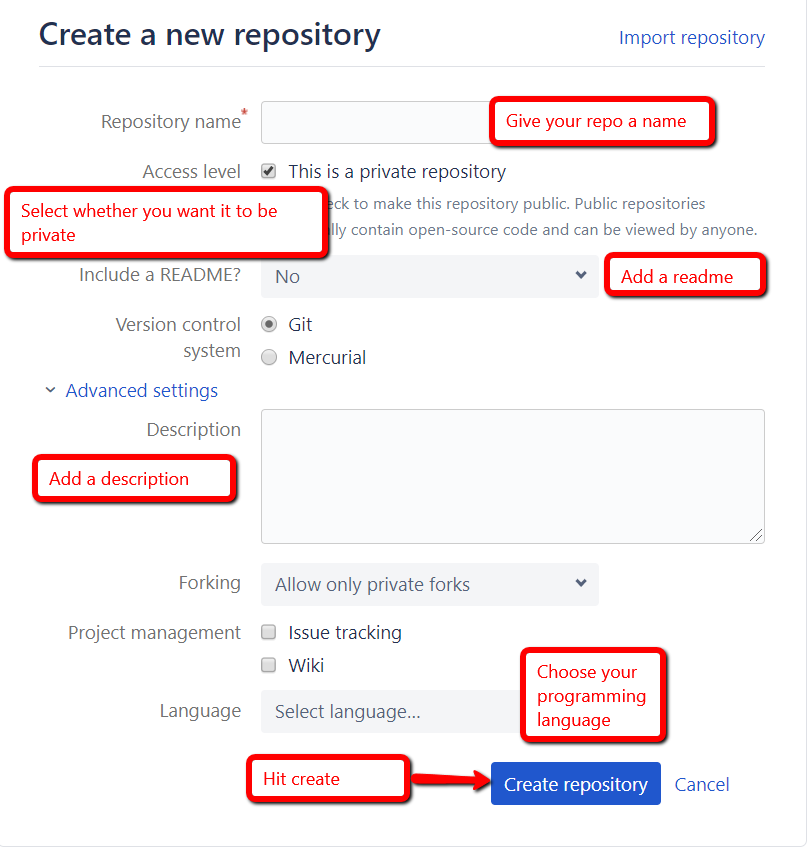
                                                                                                                      And now to initiate and link your repo with your machine, it’s the following command:

                                                                                                                      git remote add origin URLTOREPO

                                                                                                                      And we’re done.

                                                                                                                      Different repo hosts have different initiation commands, but they’re all pretty similar and well documented, so you shouldn’t have any issues if you choose a different platform.

                                                                                                                      Committing In Git

                                                                                                                      Committing is one of the most vital commands in Git. It’s how you “Save” your work and track what you’ve done. Your commits are essentially roll-back points where you can go back to if you break something or want to go in a different direction.

                                                                                                                      The committing process in Git is really easy and, if you’ve followed the instructions thus far, it’ll be efficient and your data analysis work will have nice, clean repos, free of unnecessary files.

                                                                                                                      First, you have to add your changes to the commit. There are a couple of different ways that you can do this.

                                                                                                                      Adding Changes To Your Commit

                                                                                                                      To add all your changes, including new files or updated ones, the command is:

                                                                                                                      git add .

                                                                                                                      This will add everything to your commit and is probably the command you’ll use the most. It’s certainly my most common one.

                                                                                                                      However, if you only want to commit changes from one file, it’s:

                                                                                                                      git add NAMEOFFILE

                                                                                                                      Or for folders, it’s:

                                                                                                                      git add NAMEOFFOLDER/

                                                                                                                      Now you’ve got your files added to your commit, we need to actually commit these changes. Here’s how.

                                                                                                                      Git Commit Commands

                                                                                                                      There are a number of different Git commit commands you can use, but the below one is my preferred one. I’ll explain why shortly.

                                                                                                                      git commit -m "Your message"

                                                                                                                      Let’s break down how this works and why I prefer it over some of the other methods.

                                                                                                                      • git commit This part is the actual commit command, telling it that you wish to commit your changes to the repository
                                                                                                                      • -m This part tells Git that you wish to add a message to the commit. This is really important in version control, because it gives information about what has been changed, enabling you to see it at a glance. If you take anything from this guide, let it be this
                                                                                                                      • Your commit message Your message wrapped in quotation marks. Make it a good one – the more detail you give here, the easier things will be later

                                                                                                                      Commit Messages

                                                                                                                      As I alluded to above, commit messages are vital in Git, whether you’re working on data analysis, software development or a long document, whether it’s solo or you’re working as a team on the same project.

                                                                                                                      A commit message gives information about what’s been changed in this version, which is why it’s so important to version control. It doesn’t need to be War & Peace, but it should be more informative than “Did stuff”.

                                                                                                                      Try to keep them professional too. There might be times where you’re required to share your repo with a client at the end of a project, and they will probably not appreciate a torrent of commit messages calling them a douchecanoe or bagging on other team members.

                                                                                                                      In my opinion, there is nothing more important than commit messages in Git. They are the key element in version control and they take seconds to do properly, saving yourself or other analysts/ developers hours later on.

                                                                                                                      Pushing In Git

                                                                                                                      If committing is creating your save point, pushing is making that save available to others or yourself later on through your repository host. It is literally pushing your commits to your repository host such as GitHub or Bitbucket, making the changes you’ve made on your machine or server visible and available in your host.

                                                                                                                      There are elements to pushing which we’ll need to discuss in a little more depth in the branches section, but for now, since we’re only at the initial commit stage, we’ll focus on just the master branch.

                                                                                                                      Here’s the Git command you need to push your changes to the repo:

                                                                                                                      Pushing Changes To Your Repository

                                                                                                                      git push origin YOUR BRANCH (master in this case)

                                                                                                                      And here’s how that command works:

                                                                                                                      • git push This is the command that tells Git to push your changes to the repo host
                                                                                                                      • origin This part tells it to push to the repo that we set up at the start. Origin refers to the original source, which in this case is our host
                                                                                                                      • YOUR BRANCH Finally, we need to specify the branch of our repo that we’re working on right now and that we want to push our changes to. For your initial commit, you’d use the master branch, but we’ll talk about branching a lot more in the relevant section

                                                                                                                      And there we have it: how to push to a Git repository. Please do read the section on branches so you have all the information you need to push appropriately and to use your branches properly.

                                                                                                                      Branching In Git

                                                                                                                      One of the reasons that Git is so handy is that you can develop and track certain features without it all being rolled into the same area. Branching helps you keep an eye on everything that’s happening with every feature or element without having to scroll through everything.

                                                                                                                      Think of a branch as an independent level of your version control that only focuses on one specific feature, keeping the rest of your code untouched. It could be a function in your code, such as setting up your package environment or getting a specific piece working, and you can add extra branches for testing these elements should you need to.

                                                                                                                      There are no limits to the amount of branches you can have and they stop you breaking the main run of your work, so I encourage you to use them as much as you can.

                                                                                                                      Creating Branches In Git

                                                                                                                      Creating additional branches in Git and getting them onto your host is a really easy two-step process, but before you switch them, it’s essential that you’ve committed or stashed all your previous changes, otherwise it won’t let you do it.

                                                                                                                      First, we create our new branch like so:

                                                                                                                      git checkout -b NEWBRANCHNAME

                                                                                                                      No spaces in your branch name, but you can use camel case. Keep them short with a clear name that makes it easy to understand what they’re for. A good branch name is the name of the feature, a bad branch name is newThing as that tells you or other analysts nothing.

                                                                                                                      Now you need to get this new branch onto your repo host. This is easy too. Just type:

                                                                                                                      git push origin NEWBRANCHNAME

                                                                                                                      And there you go. A new branch created and pushed to your repo host, ready to track your work on your new feature or element of your analysis.

                                                                                                                      Switching Branches In Git

                                                                                                                      As you build your piece of analysis, you’ll need to switch to different branches fairly regularly. Either you’ll need to switch to the previous branch for merging, you’ll want to switch to a previous feature to branch off again or a number of other reasons. Here’s how.

                                                                                                                      Again, you’ll need to have already committed or stashed your uncommitted changes before switching branches. We’ll cover that in more detail shortly.

                                                                                                                      git checkout BRANCHNAME

                                                                                                                      This will switch you to the branch you’ve selected. If it’s a previous branch and you haven’t merged your changes yet, you’ll likely see the work that you’ve done on that new branch disappear. Don’t panic. We’ll cover merging in a later section.

                                                                                                                      Deleting Branches In Git

                                                                                                                      Every now and then you’ll need to delete a branch. Maybe you completely broke your analysis, maybe it’s gone in the wrong direction, or you’ve finished fixing an issue with your code; there are a number of reasons why this could happen.

                                                                                                                      Deleting branches isn’t difficult and it just uses the following command:

                                                                                                                      git branch -d BRANCHNAME

                                                                                                                      Here, the -d parameter is telling Git to delete that particular branch. Nice and easy.

                                                                                                                      And that’s how you delete branches in Git.

                                                                                                                      Best Practices For Branching In Git

                                                                                                                      If you want to keep your repo clean and efficient, there are a few basic processes that you should follow.

                                                                                                                      There are a number of schools of thought on how you should manage your branching in Git, but many of them are from the software or web development world and slightly less applicable for data analysts, particularly because many of us work solo until a certain point. At least, that’s been my experience.

                                                                                                                      Over the next few sections, I’ll cover my preferred approach to managing branching based on my experience, which still lets others analyse and work with your code. Your mileage may vary, but I believe it’s a good underlying framework.

                                                                                                                      Essentially, my preferred branching structure works along three core elements:

                                                                                                                      • The master branch: Left largely untouched. The foundation
                                                                                                                      • The development branch: The core of the work, where all features are merged in before the final commit when everything is finished
                                                                                                                      • Feature, sub-feature & testing branches: Split out from development, every piece of your work or testing your work should have a separate branch until it works. Testing or debugging branches should be split out from their specific feature branches

                                                                                                                      Over the next couple of sections, I’ll take you through what these mean.

                                                                                                                      The Master Branch

                                                                                                                      Out of the box, your repo works on the master branch. This should only be used for merging into when you’ve got something working, rather than for active work, otherwise it just becomes a giant mess. Features, sub-features and debugging these features should be done on their own branches, meaning you have an easy to identify, easy to read repo that other analysts can understand if they’re working on it too.

                                                                                                                      Essentially, your master branch is the foundations of your work, not where you build the work. In Git terminology, your master branch is the trunk of the tree and the branches are what fills it out.

                                                                                                                      Right, that’s enough analogies for the master branch, let’s dip into the best way to use these other branches.

                                                                                                                      The Development Branch

                                                                                                                      This branch is where most of your work should be done. It doesn’t need to be called development, but it runs concurrent to your master branch and is where the bulk of your work is done. Your feature branches run off of this one and you merge them in as required.

                                                                                                                      After your initial commit, create this branch off of master (don’t forget to push it to your host) and use this for all your feature branches.

                                                                                                                      Feature Branches

                                                                                                                      I’m a bit anal with feature branches, I have to admit. I know some developers and analysts that do all their work off of the development branch. I do separate branches for pretty much everything, including separate branches for turning the feature I’ve been working on into a function once I’ve got them working interactively and then additional branches for testing and debugging.

                                                                                                                      Told you I was anal about them.

                                                                                                                      In my opinion, the way you use feature branches is personal preference, but my way of separate branches for everything and then sub-branches for efficiencies and testing/ debugging works very well for me, making it easy to identify where everything has been done at a glance should I need to roll back.

                                                                                                                      Drop me a line on Twitter to tell me how you’re using your feature branches.

                                                                                                                      Merging Branches In Git

                                                                                                                      The next stage of creating branches in Git is merging them in with their parent branches. This process brings the parent branch up to date and is an important part of best practice as it means that once a feature or test is complete, it gets merged into the development branch, essentially calling that feature signed off.

                                                                                                                      The Git Merge Command

                                                                                                                      There are a number of ways to merge branches, but the below is my preferred git merge command.

                                                                                                                      Switch to your target branch (don’t forget to commit or stash your changes before you do so) and use the following:

                                                                                                                      git merge --no-ff BRANCHYOUWANTTOMERGE

                                                                                                                      This merges in your branch and also creates a commit message which, depending on your setup, may open your text editor, allowing you to write one.

                                                                                                                      Let’s break it down:

                                                                                                                      • git merge The command that tells Git that we wish to merge our branch into another one
                                                                                                                      • –no-ff Stands for no fast forward. It essentially creates a commit for the merge rather than without. May trigger your text editor to create a commit message
                                                                                                                      • BRANCHYOUWANTTOMERGE The name of the branch you want to merge into your current one, usually the branch that you’ve been developing your feature on or testing it

                                                                                                                      Once the merge is complete, don’t forget to push your changes, using

                                                                                                                      git push origin TARGETBRANCHNAME

                                                                                                                      And there you go. Your branch is merged and pushed to your repository. Easy as that.

                                                                                                                      Pulling From Git Repos

                                                                                                                      Pulling repos is how you can update changes which have been made on other computers or by other people. You may want to carry on working at home, for example, or you’re collaborating on a project with other data analysts.

                                                                                                                      Essentially, the pull command gets you all the latest changes, whereas the clone command (which we’ll cover shortly) gets you an entire copy of the repo, so if you’ve worked on it on a different computer, pull is what you want. If you’ve never used it before, you’ll need to clone it.

                                                                                                                      You can pull changes to a whole repo or specific branches and it’s one of the key components in an efficient collaborative workflow. Since most of my analysis work is done solo and I live out of my Dropbox, I don’t actually use git pull that much, but it’s still worth learning.

                                                                                                                      Here’s how it works.

                                                                                                                      The Git Pull Command

                                                                                                                      To pull from a specific repo, navigate your console to the folder you want to work from and use the following command:

                                                                                                                      git pull REPO

                                                                                                                      This command pulls down the repository to your local machine, merges in any local changes and gets you ready to carry on working.

                                                                                                                      • git pull The command that tells Git we’re looking to pull a repo down
                                                                                                                      • REPO The full address to the repo on its hosting platform

                                                                                                                      Here’s how it works:

                                                                                                                      By using this command, you’ll pull any recent changes from a repo that you already have on your machine, so anything that you’ve made during the day or a collaborator has made. However, there’s another handy function of the Git pull command: the pull request.

                                                                                                                      Pull Requests In Git

                                                                                                                      A pull request isn’t exactly what it sounds like. Where you might think it’s you making a request to pull from another person’s repo, it’s actually the reverse – you’re requesting that another user makes a pull of your work.

                                                                                                                      I’ve mostly seen this used in web or software development where the programmers use it to cross-check one another’s work and it allows for extra tracking.

                                                                                                                      For example, developer X requests that developer Y pulls the latest changes to their work so they can speed up the bug hunt with a fresh pair of eyes.

                                                                                                                      Essentially, a pull request logs any changes and allows for discussion and updates before everything is merged back in. It’s not something I’ve seen used much in the data analysis field, but I think it could stand to be used more to avoid headaches.

                                                                                                                      By using a pull request, it gives your collaborators access to all the latest changes and updates, giving them the chance to review them, make updates or suggestions and ensure that when your work is finally merged in, there are fewer bugs in place.

                                                                                                                      Here’s how it works.

                                                                                                                      Creating A Pull Request

                                                                                                                      In order to create a pull request in our terminal, we use the following command:

                                                                                                                      git request-pull [-p] <start> <url> [<end>]</end></url></start>

                                                                                                                      There’s a bit going on here, so let’s break it down:

                                                                                                                      • git request-pull The command that initialises the Git pull request process
                                                                                                                      • [-p] A parameter that tells Git that we want to output all changes from the start commit to the end one
                                                                                                                      • start The point we want to start from in our merge. This is usually the feature branch we’re working on
                                                                                                                      • url The repo we want to compare our changes to. It can be local or, more often, it’s a repo on a hosting platform like GitHub or Bitbucket
                                                                                                                      • [end] The end point that we want to compare to. Since we usually want to compare everything, this doesn’t get used much

                                                                                                                      “<” and “>” removed because the Gutenberg editor doesn’t seem to know how to handle them properly in a list – reference the code above rather than the list for copying.

                                                                                                                      And there you have it, that’s how to create a pull request in Git. Please, if you’re collaborating with other data analysts, use them. They can save a lot of pain later on.

                                                                                                                      Cloning Repositories In Git

                                                                                                                      If you need to get an entire repository to your local machine including a full change history, git clone is what you need. Git clone does exactly what it says on the tin: clones the entire repo. You may remember it from when you created your first repo, but it’s also what you’d use if you wanted to start working on something from GitHub or Bitbucket, such as a collaborative or open source project.

                                                                                                                      The Git Clone Command

                                                                                                                      To clone a full repository in Git, here’s the command you need:

                                                                                                                      git clone origin LINKTOREPO

                                                                                                                      Broken down, the command works as follows:

                                                                                                                      • git clone The command that tells Git we want to clone the entire repo
                                                                                                                      • origin Here, we’re telling Git that we want to take this repository from its origin, which is the repo host
                                                                                                                      • LINKTOREPO The URL of the repo on our chosen host. Depending on whether you set up SSH or not with the relevant host, there will be different URLs. More on that in a second

                                                                                                                      With this, you’ll have the full repo on your local machine, ready to work from whichever branch you cloned. In most cases, you’ll take the master branch, but in some cases, you’ll want to work from a specific one if it’s more up to date.

                                                                                                                      Git Clone With SSH Vs Without

                                                                                                                      If you didn’t set up your SSH key with your chosen Git host, you’ll need to use a different URL to clone. Here’s how you can find them both with GitHub or Bitbucket. If you’re using a different repo host, this will still give you an idea of what you’re looking for, whether you’ve got SSH or not.

                                                                                                                      Again, it’s really worth setting up your SSH keys and linking them to your chosen repo host accordingly, otherwise you’ll have to enter your password every time you push.

                                                                                                                      Finding SSH And Non-SSH Repo URLs In GitHub

                                                                                                                      When you’re cloning a repo from GitHub, you’ll need the target URL for your command. Below, I’ll show you where you can find the SSH and non-SSH versions of that URL.

                                                                                                                      The Clone/ Download command in GitHub
                                                                                                                      First, click the Clone/ Download button on your chosen repo
                                                                                                                      Finding SSH and https repo URLs in GitHub
                                                                                                                      Choose between the SSH URL (1) and https URL (2)

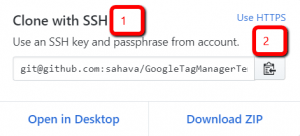
                                                                                                                      If you’ve added your SSH key to GitHub, use the SSH URL (highlighted as 1) and if you haven’t, use the https version (highlighted as 2).

                                                                                                                      Using the above command with the right target URL will mean that you get your repo downloaded to your machine.

                                                                                                                      Finding SSH And Non-SSH Repo URLs In Bitbucket

                                                                                                                      Similarly to GitHub, if you don’t have your SSH keys set up with Bitbucket, you’ll have to use different URLs for your git clone command.

                                                                                                                      Here’s how you’ll find them.

                                                                                                                      Choose between SSH and https URLs to clone a Bitbucket repo
                                                                                                                      Select SSH vs https URLs from the dropdown

                                                                                                                      If you’re using SSH with Bitbucket, you’ll need the SSH URL (top in the dropdown) and if you’re not, you’ll want the https version (second in the dropdown).

                                                                                                                      And that’s how you find your SSH and non-SSH URLs for cloning a repo from Bitbucket. Please, save yourself the time and hassle and add your SSH keys to the platform when you set up your account.

                                                                                                                      Forking In Git

                                                                                                                      Another really useful feature in Git is the ability to fork a repository; making a copy of the repo and making your own changes without affecting the original project.

                                                                                                                      This can be really useful for experimentation and testing, but also is a great way to play with public repos from GitHub or similar and creating your own projects based on other people’s work.

                                                                                                                      The Git Fork Process

                                                                                                                      There’s no specific git fork command, rather it’s a process using the clone command and the front-end interfaces of your chosen repo host.

                                                                                                                      Essentially, forking a repository is making another copy of the repo on your chosen hosting platform and then cloning that new repo to your local machine.

                                                                                                                      Here’s how you do it:

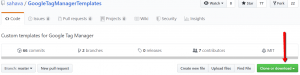
                                                                                                                      Firstly, navigate to the repo you want to fork.

                                                                                                                      Now select the Fork command in the front end. On GitHub, you’ll find it here:

                                                                                                                      Forking in GitHub

                                                                                                                      And on Bitbucket, it’s here:

                                                                                                                      Forking repositories in Bitbucket

                                                                                                                      This will create a copy of the repository in your account.

                                                                                                                      Now you need to clone it to your local machine, as we discussed in the previous section.

                                                                                                                      To reiterate, the commands are:

                                                                                                                      CD to your chosen directory.

                                                                                                                      Initialise Git with

                                                                                                                      Git init

                                                                                                                      Now clone the repo with

                                                                                                                      git clone origin LINKTOFORKREPO

                                                                                                                      Where LINKTOFORKREPO is the link to your own fork of the repository rather than the original.

                                                                                                                      Now you’ll have a local copy of your fork, allowing you to make as many changes as you like without affecting the original.

                                                                                                                      However, that’s not all we can do with this. One of the really handy features of forking is the ability to keep your copy up to date with any changes made in the original repo. Here’s how you can do that.

                                                                                                                      Automatically Add Upstream Changes To Your Fork

                                                                                                                      In your fork’s working directory, run the following commands:

                                                                                                                      git remote -v

                                                                                                                      This will allow you to see the URL of your hosted repo for fetching and pushing.

                                                                                                                      Now, we need to tell Git that we want to automatically add all changes from the original to our fork. We do that with:

                                                                                                                      git remote add upstream LINKTOORIGINALREPO

                                                                                                                      Where LINKTOORIGINALREPO is the full URL of the original, copied and pasted as discussed in the Git Clone section.

                                                                                                                      And there we have it – a forked repo, cloned to your hosting account and your local machine and automatically updating any changes made by the original repo owner.

                                                                                                                      Rolling Back Changes In Git

                                                                                                                      One of my favourite things about version control, particularly Git, is that if I break something, go too far down a rabbit hole with my analysis or otherwise have to roll back to a previous point, I can. I’m sure every analyst experiences this, but that’s a big part of why this is useful, especially when collaborating.

                                                                                                                      There are a number of ways that you can roll back changes in your Git repo, which I’ll cover over the next few sections.

                                                                                                                      Revert A Local Git Commit That Hasn’t Been Pushed

                                                                                                                      If you commit changes on your local machine but you realise something is wrong before pushing, it’s really easy to revert that commit.

                                                                                                                      You’ll need the following command to revert a commit you haven’t pushed:

                                                                                                                      git reset

                                                                                                                      This is a command which you need to be a little bit careful with, since it can revert a wide range of commits if you do it wrong, such as if you have many commits before your push.

                                                                                                                      In general, the git revert command is a better and safer option for rolling back changes, which I’ll cover in a later section.

                                                                                                                      Unstage Changes In Git

                                                                                                                      Unstaging changes means that you’re removing your changes from your current commit. This can be because you’ve noticed a mistake, you committed too soon or a myriad of other reasons. Essentially, the revert command gives you the flexibility to remove specific changes from the commit whereas reset reverts the whole thing, and can lead to a number of issues going forward.

                                                                                                                      The Git Revert Command

                                                                                                                      In order to revert or undo your latest commit, it’s the following command:

                                                                                                                      git revert HEAD

                                                                                                                      It’s not too dissimilar to the git reset command that we used in the previous section, but I prefer this one as it generally causes fewer issues.

                                                                                                                      Reverting Changes In Specific Files

                                                                                                                      If you know that you’ve made a mistake in a specific file in your latest commit, but you don’t want to revert the whole thing, there are a number of ways that you can go back, but the easiest one is to simply checkout the previous version of that file using the git checkout command.

                                                                                                                      You can do this like so:

                                                                                                                      git checkout – FILE

                                                                                                                      Where FILE is the name of the file. This command will checkout the previously committed version of the file, overwriting all your local changes. If you’re one of those people that doesn’t commit for a long time, you can lose a lot of work, so this is a strong case for committing regularly and often.

                                                                                                                      Stashing And Applying Changes In Git

                                                                                                                      With so many branches flying around, or just through the general course or your work, there might come a time where you need to save some changes you’ve made but switch to another branch.

                                                                                                                      For example, you may have got to a point where you realise you’re not ready to commit or push your work as it needs some additional debugging that you want to do on a separate branch, your collaborators may have done something cool that you want to pull and work on with them for a bit, or you’ve hit a wall on part of your work and want to come back to it later.

                                                                                                                      This is where Git Stash comes in.

                                                                                                                      Git Stash lets you store your changes and clears them on your local machine, meaning you don’t have to add and commit your changes before switching branches.

                                                                                                                      Here’s how to use it.

                                                                                                                      The Git Stash Command

                                                                                                                      To stash your changes in Git, switch to another branch and come back to it later, it’s the following command:

                                                                                                                      git stash

                                                                                                                      This will stash all your changes, allowing you to switch to a different branch and carry on working, without needing to commit your unfinished changes. There are a lot of messy ways to stash one specific file’s worth of changes, but my preferred approach is to stash everything, switch to a different branch, fix things when I get around to it and either merge them in when they’re fixed or pull that specific file.

                                                                                                                      Adding Your Changes With Git Stash Apply

                                                                                                                      When you’re ready to add your changes to a different branch, or ready to carry on with what you were working on previously, you’ll want to use the following command:

                                                                                                                      git stash apply

                                                                                                                      This will bring back all your previous changes. If you’ve just gone to a new branch straight after doing the work and didn’t want it all to be on the previous branch – a cleanup operation, for example – this will be an easy move.

                                                                                                                      However, if you’ve done other work since then, you need to be a bit careful about merging this new branch as you could cause a merge conflict or even overwrite all your other work.

                                                                                                                      I’ll talk about fixing merge conflicts in a later section, but here’s how you can ensure that your changes only affect the chosen files on other branches:

                                                                                                                      git checkout stash@{0} – FILENAME

                                                                                                                      Let’s break that down:

                                                                                                                      • git checkout Similar to switching branches, we are checking out this specific file from our stash rather than directly applying it
                                                                                                                      • stash@{0} Here, we’re checking out from a specific stash. 0 is the most recent, but we can use any number we like to pull from different stashes in our stack. More on that in a moment
                                                                                                                      • – FILENAME The name of the specific file from our stash that we want to check out

                                                                                                                      As great as this is, what if you’re not sure which stash you want to check out, or you’re not sure what’s changed in your current commit since then?

                                                                                                                      Here’s how.

                                                                                                                      Seeing Changes In Your Stash Vs Your Current Commit

                                                                                                                      Of course, sometimes, you won’t exactly remember what’s in your stash before applying it, which can make applying those changes slightly risky.

                                                                                                                      Here’s how you can see which differences are in your stash vs the current version:

                                                                                                                      git difftool stash HEAD

                                                                                                                      If you set up your difftool the way we spoke about earlier, this should load up your external tool and let you see the differences between your current commit and your last stash.

                                                                                                                      If you’ve got a few different stashes and you want to see the differences between a specific one and your current commit, you can use the following commands:

                                                                                                                      • git stash list: This will show you the full list of stashes in your repository
                                                                                                                      • git stash show: This will show you the files that were changed in your last stash. You can inspect the files changed in a specific stash from your list with git stash show -p stash@{NUMBER IN THE LIST}

                                                                                                                      Now you know which stash you want to inspect with your difftool, you can do it like so:

                                                                                                                      git difftool stash@{NUMBER IN THE LIST} HEAD

                                                                                                                      This will open up your difftool and show you the changes between your current commit and the specific stash in the list. Pretty handy, right?

                                                                                                                      This is a great way to see where you’ve been vs where you are, decide if you want or need to apply a specific stash or if you need to go way back.

                                                                                                                      There are a lot of things you can do with git stash and I haven’t fully covered it here, simply because I’ve never needed to go that much further into it with my data analysis work. Your mileage may vary though – drop me a line if there’s something I’ve missed that you’d like me to expand on.

                                                                                                                      Merge Conflicts In Git And How To Fix Them

                                                                                                                      A merge conflict in Git is quite a common issue and occurs when you have conflicting changes in your repo.

                                                                                                                      They happen to everyone, especially if you’re collaborating with other analysts, so don’t feel bad if you come across one. Hell, I get them when I’m working on my own!

                                                                                                                      A merge conflict is caused by different changes being made on the same branch or line of code when you try to merge, or a file being deleted while someone else is working on them. They only affect the person trying to merge and they don’t notify anyone else working on the repo, so you don’t get publicly shamed if you get one.

                                                                                                                      Git handles most of these automatically, but they still happen when Git can’t work out what it should keep and what it should remove.

                                                                                                                      Merge conflicts aren’t the end of the world and most of the time, they’re easy to fix. Here’s how.

                                                                                                                      Fixing Merge Conflicts In Git

                                                                                                                      If you’ve got a merge conflict, you’ll see an error message in your terminal when you try to merge a branch. This message is really handy because it’ll tell you which file has the conflict.

                                                                                                                      Now we break out our trusty text editor on the file in question and it will alert you to where the conflict lies with <<<<<<< HEAD, which denotes the changes from the current branch and =======, which segregates the existing branch followed by >>>>>>> BRANCHNAME which tells you which branch the conflict is on.

                                                                                                                      With this information in our text editor, we have pretty much all the information that we need to resolve this merge conflict.

                                                                                                                      Use your text editor to update your work accordingly. It may be that you’ve made changes on that specific line since the older branch was updated, or it could be a number of other things.

                                                                                                                      You need to make a decision around which of the variations you want to keep – do you want your current branches changes or do you want to stick with what was done previously? This can get a little tricky when you have conflicts caused by collaboration, but that’s where communication comes in.

                                                                                                                      Communication Solves Merge Conflicts

                                                                                                                      If someone else has made changes which have caused the conflict, just ask the other analyst or developer whether these changes will break their work etc and come to a conclusion around which version you should use going forwards.Once you’ve decided what you’re going to keep and what you’re going to disregard, delete the conflict markers (<<<, === and >>>), make the final changes and you should be good to go.

                                                                                                                      And there you go, your merge conflict should be resolved and you’re ready to merge your branches and continue with your work.

                                                                                                                      Cherry Picking In Git

                                                                                                                      The Cherry Pick command is a really powerful function, but something that should only be applied sparingly. Essentially, it allows for you to apply changes from a specific commit to other commits. It can be incredibly useful when you’re collaborating, but it can also cause a lot more problems than it solves.

                                                                                                                      As I say, you need to be really careful with the Git Cherry Pick command, but if you’re confident that the changes you want to apply from one commit to another aren’t going to cause any issues, or you’ve discussed them with your collaborators and you’re all comfortable with the ramifications, here’s how you use it:

                                                                                                                      Using Git Cherry Pick

                                                                                                                      Git cherry-pick is a multi-stage command. It works as follows:

                                                                                                                      1. Find your commit
                                                                                                                      2. Cherry-pick your chosen commit
                                                                                                                      3. Choose the branch you want to pick from in your chosen commit
                                                                                                                      4. Choose the branch you want to apply that previous commit to

                                                                                                                      Let’s break this down into the commands you need:

                                                                                                                      First, run:

                                                                                                                      git log

                                                                                                                      or look in your commits in your repo host to find the commit that you want to cherry pick from. This command will list all the commits, allowing you to find the reference for the commit you want to use.

                                                                                                                      Once you’ve got this, you’ll need to run:

                                                                                                                      git cherry-pick COMMITID

                                                                                                                      With COMMITID being the reference for the commit you want to pick from.

                                                                                                                      Now we need to specify the branch we want to pick from our chosen commit. We do that like so:

                                                                                                                      git checkout BRANCHNAME

                                                                                                                      With BRANCHNAME being the name of the branch we want to pick from in our chosen commit.

                                                                                                                      And now, we need to specify the name of the branch that we want to apply these changes to. I recommend using a sub-branch such as an extra feature or debug branch for this, so you don’t break the main flow of your work.

                                                                                                                      git cherry-pick TARGETBRANCH

                                                                                                                      This completes the cherry-pick process and applies the changes from our chosen target branch to the target branch. Again, please don’t do this to one of your main branches – always use a sub-branch.

                                                                                                                      Additional Git Cherry Pick Parameters

                                                                                                                      There are a number of additional parameters that you can use with your git cherry-pick command that give you some extra functionality. Here’s what you can do:

                                                                                                                      • –edit This triggers a request for a commit message before applying the cherry pick. Well worth using, especially if you’re collaborating with other analysts
                                                                                                                      • –signoff Adds a “Signoff” message to the end of the cherry pick commit message
                                                                                                                      • –no-commit Executes the cherry pick without generating a new commit and moves everything from the target branch onto the current branch

                                                                                                                      If nothing else, I really recommend using the -edit parameter when cherry picking. As you’ll probably have gathered through this post, I’m a big fan of making sure everything is trackable and that commit messages are used as regularly as possible. That’s a big part of why we’re using version control, after all.

                                                                                                                      Challenges With Git Cherry Pick

                                                                                                                      This all sounds great, doesn’t it? Being able to apply specific previous commits to ongoing work and new branches is a great feature, but it comes with some caveats.

                                                                                                                      Firstly, cherry picking can lead to duplicated commits, so you need to be careful of that. Always ensure that you’re not committing the same piece of work more than once to keep your repository clean.

                                                                                                                      There are also times where people use cherry pick in place of regular merge functionality, which really isn’t best practice. This usually tends to be done by people that have just discovered cherry picking and, while it can work, it’s not the right way to do things. I generally only recommend cherry picking when you have people that need to collaborate on specific elements or when you need to fix a bug quickly.

                                                                                                                      That said, git cherry pick is a really powerful function and can be a great addition to a data analysts’ workflow. Just don’t use it in place of proper merging.

                                                                                                                      Rebasing Your Git Repository

                                                                                                                      Rebasing is not too dissimilar from merging a branch, but it offers one key functional difference: Git rebase rewrites your entire commit history.

                                                                                                                      Essentially, a git rebase gets rid of all the old commits caused by merging and gives you the chance to rewrite your commit messages if you do it using the interactive method, which I’ll cover shortly. It basically lets you move all your old commits to a new base commit.

                                                                                                                      This can be really handy if you’ve had a messy project or someone on the team has written some “interesting” commit messages. It also makes your project path linear rather than branched, so you can see everything in one go. You really shouldn’t use it on public repo’s as it’ll look like your entire commit history has disappeared.

                                                                                                                      However, there are also some issues with it which I’ll cover in a couple of sections’ time.

                                                                                                                      Using Standard Git Rebase

                                                                                                                      To use the standard Git rebase, you need the following commands:

                                                                                                                      First, you need to select the branch you want to rebase and decide onto which branch you want to send it to. Then, to apply all the commits from that branch to your new base, use:

                                                                                                                      git rebase BRANCHNAME

                                                                                                                      For example, you may wish to checkout one of your feature branches and move it and all its commits to your master branch. In which case, the command would be

                                                                                                                      git rebase master

                                                                                                                      Essentially, this command looks for the common point in the two branches (your current branch and the branch you want to rebase onto) and then applies all the changes from your current branch to the target.

                                                                                                                      From here, use a fast-forward merge by checking out your target branch and then using the following merge command:

                                                                                                                      git merge PREVIOUSBRANCHNAME

                                                                                                                      And that’s how you run a standard rebase in Git.

                                                                                                                      Using Interactive Git Rebase

                                                                                                                      The interactive version of Git rebase gives you the chance to work through each applied commit rather than automatically doing it. This is a really handy opportunity to clean up previous work, rewrite commit messages and so on.

                                                                                                                      To initialise an interactive rebase, navigate to the branch you want to rebase from, choose the branch you want to rebase on to and use the following:

                                                                                                                      git rebase -i

                                                                                                                      This will open up an editor where you can use a series of different commands for each commit, allowing you to really clean up your history:

                                                                                                                      • p: Pick – this uses the commit as-is
                                                                                                                      • r: Reword – uses the commit as-is, but lets you rewrite your commit message
                                                                                                                      • e: Edit – uses the commit but lets you make changes to it
                                                                                                                      • s: Squash – uses the commit, but merges it in with the previous commit
                                                                                                                      • f: Fixup – similar to Squash, but gets rid of the commit’s log message
                                                                                                                      • x: Exec – runs the rest of the line in the shell
                                                                                                                      • d: Drop – removes the commit

                                                                                                                      As you can see, the interactive rebase is a really powerful function and gives you the opportunity to take full control of your commit history.

                                                                                                                      Further Reading

                                                                                                                      I know I called this the Complete Guide To Git For Data Analysts, and I genuinely believe that this piece gives an analyst everything they need to incorporate Git into their daily workflow, improving collaboration and minimising restarts due to breakage. However, it’s not 100% exhaustive – if it was, it would be double the size and I’d still be writing it six months down the line.

                                                                                                                      As such, here are some other pieces you can read to get a little more detail on some of the sections:

                                                                                                                      Shout Outs

                                                                                                                      This has been a pretty mammoth undertaking, written on my tablet at weekends over the last few months. It wouldn’t have been possible without:

                                                                                                                      • My stalwart Lenovo Yoga 3 Plus tablet
                                                                                                                      • Dropbox, for syncing my work between my different devices
                                                                                                                      • Digitalocean (aff) for hosting my site and keeping it fast
                                                                                                                      • This course from Jason Taylor, where I learned a lot of the basics of Git and figured out how to apply it to my day-to-day from there
                                                                                                                      • Aden Fraser from Fraser Jilani for double-checking my work and letting me know when there were better ways to do things

                                                                                                                      Thank you.

                                                                                                                      Wrapping Up

                                                                                                                      And there you have it – the sum total of my knowledge of Git and how it can be applied for data analysts.

                                                                                                                      Hopefully you’ve found it useful and will start to apply it in your day-to-day work. If you do, please share this post and I hope you’ll consider signing up for my free email list, where you can get a copy of this document as a PDF and will be alerted to any new articles I post. No spam, no sales pitches, just fresh content.

                                                                                                                      Thanks for reading.

                                                                                                                      Until next time.