Tracking Email In Google Analytics
Email is one of my favourite marketing channels. There’s so much data to work with, and then there’s all the creativity that you can put into the design, the email copy, the subject line… I could go on for hours.
But one of the things that always annoys me about email campaigns is the part that should be the most simple: tracking and monitoring the performance of them.
Sure, you’ve got the UTM tags feeding into Google Analytics, you’ve got the open and click metrics in your email platform, you might even have conversion goals in there, but what you’ve also got is an enormous disconnect.
In today’s post, we’re going to try and break down that disconnect, bringing all your email activity into Google Analytics and then follow up with a brief idea of what you can do after your campaign has run.
By the end of this guide, you’ll be able to do the following email tracking from the comfort of your Google Analytics account:
- Track email opens in Google Analytics as events
- Potentially get around Gmail’s infuriating image proxy
- Track visits to your site and monitor user activity
- Use your email list and engagement to create some Google Analytics Audiences
Sounds fun, right?
But before we jump into the cool stuff, first we need to understand why we’re doing this.
This is another long one, so feel free to skip around using the table of contents below and please do sign up for my email list for free updates whenever I post something new.
Contents
Email Tracking Is Broken
I’m sorry, but it is. Traditional email tracking and monitoring flat out sucks and as marketers, it’s on us to do better, rather than just using what we’re given and hoping for the best.
Why is it broken? Simple: the thing we’re going to focus on today – the disconnect between all the different platforms.
This could turn into a long rant, so I promise to be brief.
The Platform Disconnect
Here’s what marketing tool manufacturers don’t tell you: they all measure performance differently, usually in a way to make themselves look better. The number of times different tools take credit for the same conversion is insanity.
Add to that, the fundamental challenge of email tracking, where opens and clicks aren’t directly tracked in Google Analytics or other web analytics packages, leaving them outside the standard user journey, while other channels like display or social count conversions from people that have seen the ad but taken no action, you can see that there is a disconnect here.
In today’s piece, I’m going to try and break down that disconnect a little, by bringing people who have opened your email into the journey. They should be, after all – they’ve seen your message and been brought into the conversion journey, whether they clicked on the email or not.
It’s not perfect – nothing is – but at least by ensuring that your email opens are in Google Analytics, it brings you one step closer to repairing this disconnect.
Tracking Email Opens In Google Analytics
The first thing we want to track – and something that a lot of email marketers miss or don’t even know is possible – is the number of people that open the email and feed that into Google Analytics. Sure, the email tools will give you this number, but it won’t be in the same platform, meaning there is still that disconnect.
This is quite easy, but there are some elements we have to consider. To do this, we’re going to leverage the Measurement Protocol – a little-discussed element of Google Analytics which lets you send HTTP requests directly to the platform. In layman’s terms, this means you can push data straight into Google Analytics.
There’s a whole series of posts that I could write about the Measurement Protocol (and maybe one day I will), but suffice to say that I’m a big fan of it and the possibilities for it and taking all marketing channels further are nearly endless.
Today, we’re going to use a simple Measurement Protocol request to push an event through to Google Analytics that says that the email has been opened. We’re going to have some fun with some of the dynamic elements that email can use too, so we’ll be able to identify the actual email that the user came from, and assign them a unique ID.
Setting Email Opens As Google Analytics Events
Essentially, what we’re going to do here is use Google Analytics’ Measurement Protocol to send an Event hit through to Google Analytics whenever a user opens our email, but we’re also going to leverage some of the dynamic parameters from the different email platforms to identify who the user is (anonymised, obviously, to stay within Google’s terms of service) and which email they’ve opened.
Through doing this, we’re able to get our user into our Google Analytics ecosystem and incorporate them into different attribution models and audiences, whether they’ve visited the site directly from our email or not. By bringing the user into the journey from the email open, we’re able to have a much more accurate attribution model, especially compared to other platforms like Facebook or display tools where they include users who have seen that ad. It’s a great way to level the playing field for all different channels.
Alright, let’s look at how it works.
The Measurement Protocol’s Email Open Pixel
Setting this up is actually quite easy. We just need to add another image to our email. I’m using MailChimp for this tutorial, but the same applies for other platforms. You can refer to this handy guide to MailChimp merge tags to create your own dynamic parameters.
In order to get our email open tracking to feed into Google Analytics via the Measurement Protocol, we need to embed a URL into our email. The easiest and most effective way to do that is via setting the tracking URL as an image.
Here’s what that URL would look like:
https://www.google-analytics.com/collect?v=1&tid=UA-XXXXXXXX-X&cid=*|UNIQID|*&t=event&ec=email&ea=open&el=*|MC:SUBJECT|*&cs=newsletter&cm=email&cn=*|MC:SUBJECT|*&dp=%2Femail%2F*|CAMPAIGN_UID|*&dt=newsletter
Before we get into how to make this work in your emails, let’s break down what the different parameters in that URL are doing so that you can update it to fit your own needs:
- https://www.google-analytics.com/collect?v=1 The payload address, the link that the information will feed through to
- &tid= Your Google Analytics property’s unique ID. This is the part of the URL that identifies which account this hit should be sent to
- &cid= The client ID, a unique identifying number to help Google Analytics match your event up to other activity. You must not use any personally-identifiable information here, but you can use a dynamic variable to match it up with your Google Analytics user reports. Here, I’ve used the MailChimp merge tag for Unique ID
- &t=event&ec=email This part tells Google Analytics that the hit we’re sending through to the system is an event and that the event’s category is “email”
- &ea=open The second factor of our event tracking, in this case, we’re telling Google Analytics that the event action is “open”, which makes sense since they’ve just opened our email
- &el= Our event label, which we use to differentiate this event from others with the same category and action. There are a number of schools of thought on how best to use this for email, but personally, I favour using the email’s subject line so I can easily aggregate and report on the performance of that particular email. Here, I’ve used the MailChimp merge tag for subject line
- &cs=newsletter&cm=email The campaign source and campaign medium to which your event should be assigned. In this case, they’re “newsletter” and “email”, but adapt to your own usage. Remember, these should match the source and medium in your UTM parameters (more on that later)
- &cn= The name of your campaign. Again, for consistency within your analysis, I recommend using the subject line merge tag here, and make sure you use that same tag for your UTM parameter when sending the email, otherwise you’re causing another disconnect. You can use whatever parameter you like here, really, as long as you’re consistent
- &dp=%2Femail%2F*|CAMPAIGN_UID|* This is how we create a URL path for these emails, since emails don’t really have a URL. It’s important that each email has a unique path, so I’ve gotten around that here by using the MailChimp merge tag for the Campaign’s unique ID. The final URL that’s visible in Google Analytics here will be /email/WHATEVER as %2F is the equivalent of the / character. Your dp= parameter has to begin with that /
- &dt=newsletter Finally, the dt= parameter. DT means “Document Title” and it’s the name of the tracked item. Here, I’ve just called it “newsletter”, but you can call it whatever you like as long as you’re consistent and are following a solid naming convention
Now we know what our target URL contains and what the different parameters mean, let’s see how we can use it.
Using The Measurement Protocol’s Email Open Pixel
In order to use this URL to track our email opens in Google Analytics, we need to embed it in our email in a way that it can trigger the event without a user clicking on anything. The easiest way to do this is to embed it into an image.
Once you’ve compiled your URL using the appropriate IDs and merge tags for your platform, wrap it in the following tag:
<img src="GA HIT URL">
With “GA HIT URL” being replaced with the URL we’ve just created. Remember to use the speech marks.
Adding this to your email will cause your hit URL to be treated like an image of 1×1 pixels. Users won’t see it in your email, but it’ll be there and will be able to feed the open event through to your Google Analytics account.
Generally, it’s best to add this to the very bottom of your email, and make sure that you add it as a custom HTML block in your email platform of choice, otherwise all users will see is the URL.
Providing you’ve followed all these steps correctly, you should see the following in your Google Analytics account when you do a test email:

If it comes through properly in the Real Time section of Google Analytics, you’re ready to send the email out.
But what if your users are on Gmail or other web-based email platforms?
There’s a challenge here.
The Image Cache
Gmail’s Image Cache is the bane of email marketers. It’s been causing problems for a number of years and, sadly, leveraging the Measurement Protocol doesn’t 100% solve the issue either.
Essentially, the image cache means that Gmail takes all of your images and all of your URLs in your emails, caches them and serves them from their own CDN, meaning your email opening pixel doesn’t always work.
There are a number of reasons behind why they would do this, but none of them stop this being a major pain for email marketers.
Email platform developers have spent years trying to get around this so that their users can accurately track their email opens, with varying degrees of success, but still without complete success and, sadly, today’s post is no different.
However, I do have something which works most of the time, which I’ll share with you today.
Getting Around Google’s Image Cache
If you add the following lines to your email’s header as custom HTML, you tell the different platforms not to cache the images, including your tracking pixel.
<meta http-equiv="Cache-Control" content="no-cache, no-store, must-revalidate">
<meta http-equiv="Pragma" content="no-cache">
<meta http-equiv="Expires" content="0">
By forcing non-caching, I’ve found that I can successfully track emails sent to Gmail accounts within Google Analytics the majority of the time. It’s not perfect, but it’s the best solution I’ve found so far.
If you have a better solution, I would genuinely love to hear it. Please hit me up on Twitter and I’ll update this post with a link if you’ve got something that works.
Now we’ve got our email open data into Google Analytics, what’s next? How do we track what the users who click our link do on our site?
Tracking Users From An Email In Google Analytics
Fortunately, this is a lot easier than tracking the email opens in Google Analytics, and most email marketing platforms will do this out of the box, as long as you remember to enable it.
As nice as that is, there are some things we can do to improve the quality of our data rather than just relying on what the platform gives us.
Here’s how.
Creating UTM Parameters For Email Tracking
UTM parameters are a way of feeding a specific channel’s data into Google Analytics and are generally used when that channel doesn’t specify a referrer. In the case of email, they’re vital, otherwise all the activity a user undertakes on your site following the click of your message will be attributed to direct traffic, which is really not helpful when you’re trying to analyse performance.
By adding these elements to the URLs in your email links, you’ll be able to track the people that have visited your site from your newsletter as though they came from another channel such as organic or paid search.
Again, most platforms do it out of the box, but there are a few areas that we can improve on the default setup.
Firstly, let’s look at how UTM parameters work.
The Anatomy Of UTM Parameters
There are a wide range of different elements that you can add to your UTM parameters, but there are three core ones that you should always use for your emails as these are the ones which are most commonly seen in Google Analytics.
- utm_source The campaign’s source, the data that will be reported in your Google Analytics source dimension. I would typically use “Newsletter” here if it’s an email newsletter, “purchase_message” if they’ve just made a purchase and so on
- utm_medium The campaign’s medium, which will be seen in your Google Analytics medium dimension. Here, I’d suggest always using “Email”, so your campaigns are consistent and easy to find in Google Analytics
- utm_campaign The name of your campaign, the thing you will use to differentiate between your different emails. There are a lot of different ways that you can do this. MailChimp typically automatically appends the date it was sent, but you can change it to your subject line easily enough
Now we know what goes into a UTM parameter, let’s see what one looks like.
Creating Your UTM Parameters
There are a number of ways that we can create our UTM parameters to track clicks from our emails. In a lot of cases, it’s worth using the tool’s default tracking area, just for convenience, but the big challenge with doing that is that you can’t add dynamic elements such as merge tags in there. Well, you can, but they don’t work the way they should.
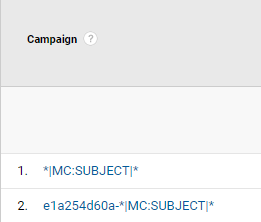
Thankfully, merge tags can still be used to give you lots of tasty dynamic information in your tracking URLs, it’s just that you’ll need to manually add them to every link in your template.
For MailChimp users, a tracking URL with the source being “newsletter”, the medium being “email” and the subject line being a merge tag to bring in your subject line would look like this:
?utm_source=newsletter&utm_medium=email&utm_campaign=*|MC:SUBJECT|*
Append that to every URL in your email and you’ll see the following in your Google Analytics reports when users click the link:
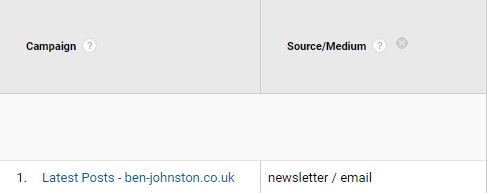
This might not be the most useful campaign tracking option if you use the same subject line for every mail, but you can take a look at the MailChimp merge tags cheat sheet (or the similar one for whichever platform you’re using) and find ones that will be useful for you.
Using Multiple Merge Tags In UTM Parameters
You can also double-up on these campaign elements with merge tags if you add the %20 character between them, like so:
?utm_source=newsletter&utm_medium=email&utm_campaign=*|MC:SUBJECT|*%20*|CAMPAIGN_UID|*
This will show you the subject line and the campaign’s unique ID in your Google Analytics reports, which could potentially be useful.
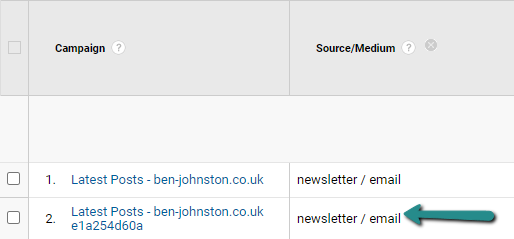
Try it yourself. The possibilities are almost endless.
Tracking everything is fantastic, but the main thing you should always be asking yourself with any measurement element is “What am I going to do with it?”.
Again, the possibilities are almost endless, but one of my favourite uses for this performance data is to create Google Analytics Audiences which you can utilise for further identifying engagement and to leverage on different channels such as Google Ads.
Creating Google Analytics Audiences From Email Activity
I could write an entirely separate article on how we can use email performance data, the Measurement Protocol and Data Import to create Google Analytics Audiences (and maybe one day I will), but today I’m going to take you through some really simple definitions that we can use based on the data we’re collecting from what we’ve already completed in today’s guide.
We’re going to create three different audiences here:
- People who have opened our email, but not clicked
- People who have clicked our email, but not converted
- People who have clicked our email and converted
These are all nice and simple audiences, but hopefully they’ll give you an idea of the possibilities and you can go and create your own. If this inspires you to create any cool Google Analytics Audiences of your own, drop me a line on Twitter. I’d love to hear about them.
Email Opened But Not Clicked Audiences
Head to your Audiences area under your Google Analytics Property settings and select New Audience.
Choose your audience source based on your target View (I recommend your Filtered Master View unless you’ve got a channel-specific View for email traffic).
Select “Create New”. Google Analytics will provide you with some suggestions, which are good for learning how to use these Audiences, but we’re going to be creating our own definitions.
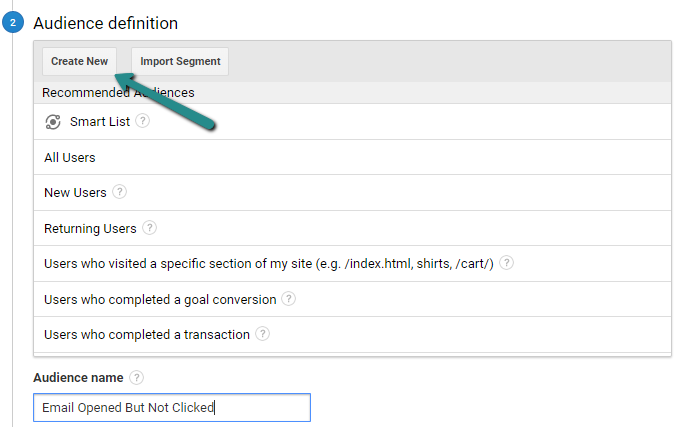
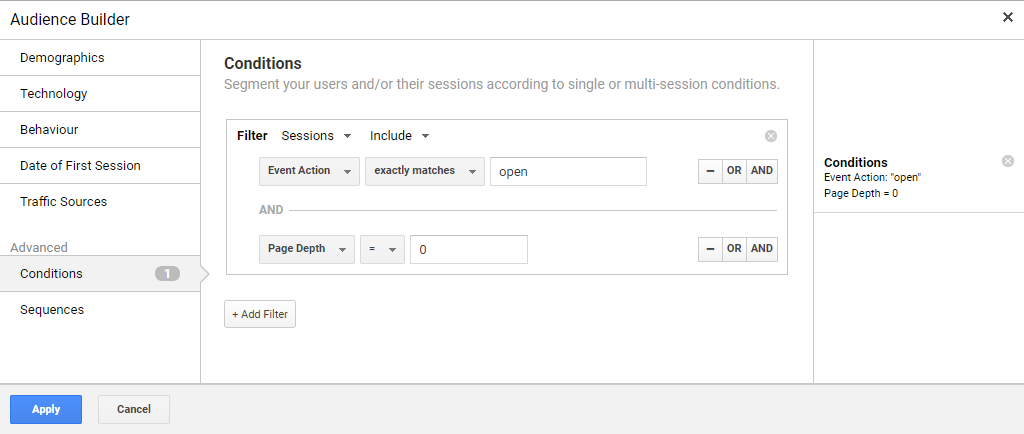
Since for this one, we’re looking at an Event specifically as our main condition, we’re going to go to Conditions.

And we want to include sessions with the Event Action “open” as that’s the event we triggered in our Measurement Protocol hit.
Since we’re looking for people that have opened the email but not clicked on any of our links, we also want to set our page depth to 0 as they have taken no action beyond triggering that event.
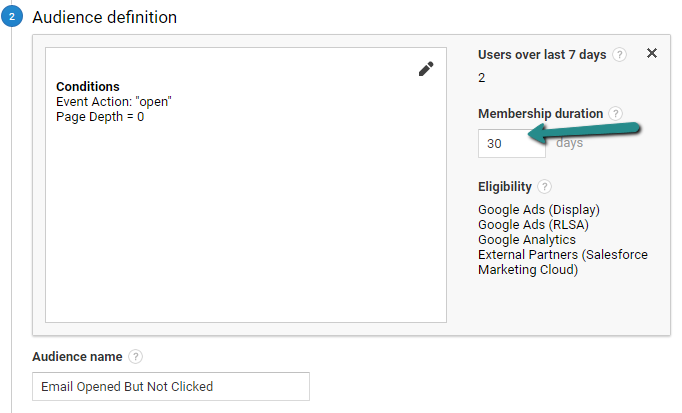
Next, we want to set the Membership Duration. This is going to be largely down to you and how active you are with your email activity. Since I’m very inactive with mine, I’m going to set it to 90 days, but you can set it to whatever you want.
Now we’re done with the definitions, your last trick is to select your Audience’s destination – the channels within which it will be used.
If you’ve got Google Ads or other Google Marketing Platform tools linked with your Analytics account, you can send those Audiences to them to be used in your marketing activity, which is kind of the point of this, right?
Hit Publish, and you’re done.
Creating our other audiences is similar, just some slight differences in how we configure them.
Email Clicked But Didn’t Convert Audiences
For this Google Analytics Audience, we’re going to look at people who have clicked the link in our email, but have not completed any of our conversion goals.
Follow the steps above to create your Audience and use the following definitions:
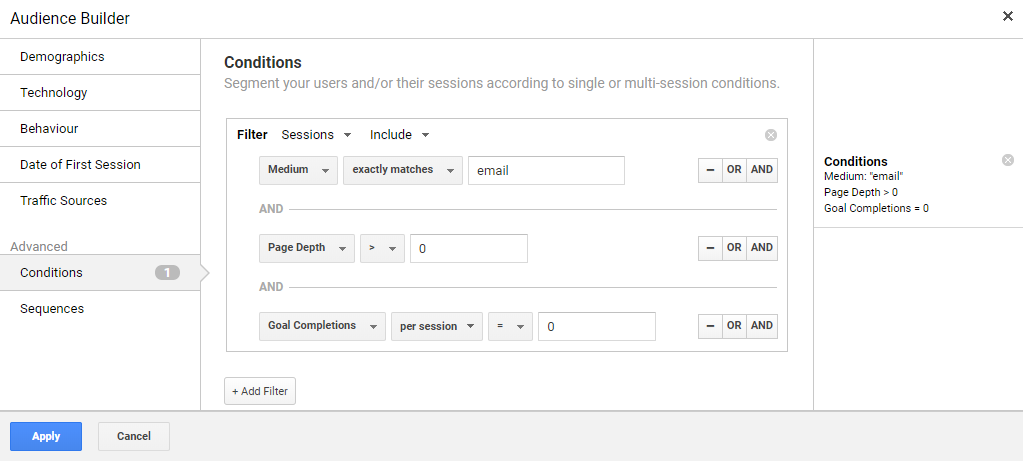
The Medium being “email” tells Google Analytics that the user has visited the site from email, but they have a page depth greater than zero and have completed no goals in that session. It’s important that we have that page depth greater than zero because our email opening hit event uses the same medium, but we don’t want to include people who have opened the email and not clicked in this Audience.
Email Clicked And Converted Audiences
For our final Google Analytics Audience, we’re going to look at people who have visited our site from the email and have completed a conversion goal, be that a form submission, made a purchase, signed up for our email list (hint, hint) or whatever else our goal is.
Follow the steps above and define your Audience as follows:
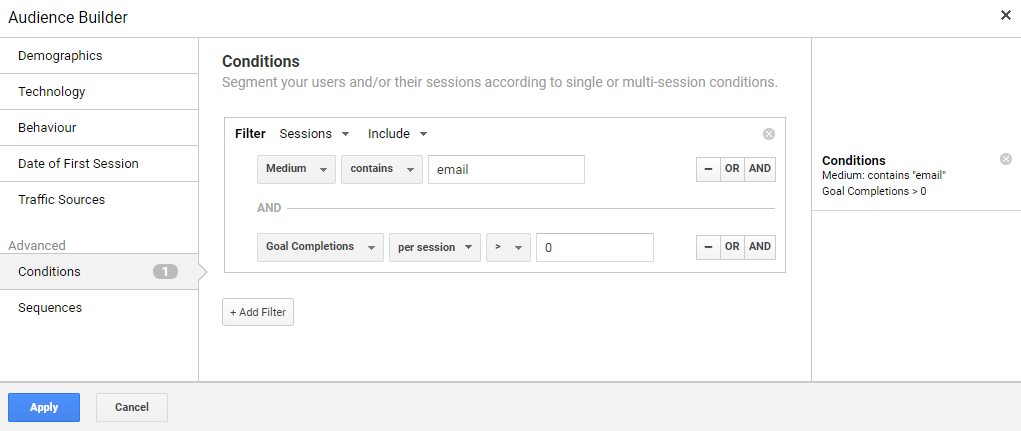
With this Audience, our definitions are simple: the user has visited from our email (hence the Medium being “email”) and they have completed a goal.
As I say, the possibilities of Google Analytics Audiences from email marketing are almost endless and will depend entirely on the kind of activity you undertake, the way that it performs and the toolkit you’re working with, but this should be a good starting point.
Wrapping Up
This post was originally meant to be much shorter and just covering the email opening event tracking, but I just can’t help myself. I might not write on here that often, but I like to think that when I do, I at least go in-depth.
I haven’t covered everything that you can do with email tracking in Google Analytics – not even close, but I hope that this gives you a good starting point for taking your analysis further. Email really is a fantastic channel and I feel it sometimes gets the short end of the stick in terms of performance reporting, so maybe something here will help change that.
Thanks for reading and I hope you’ll consider signing up for my email list so you can be kept up to date with my new posts. Lockdown has me writing more, so there should be something new coming up pretty soon.
Also thank you to the inimitable Alix Mackenzie for her help with the featured image design and the wonderful Lianna Haywood for proof-reading this post for me.
Until next time.


